Home - Arcade games - Manic Miner
Manic Miner
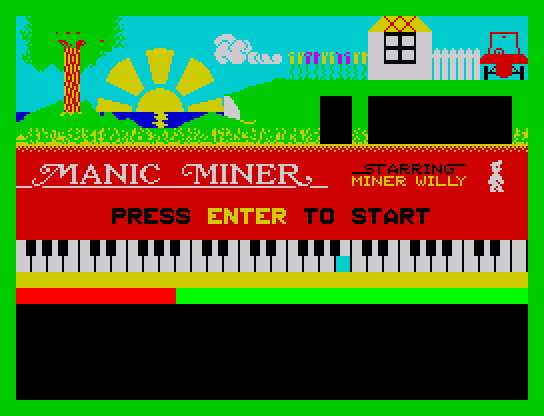
- Release year: 1983
- Publisher: Bug-Byte
- Author: Matthew Smith
- ZXDB archive entry at Spectrum Computing
The game
There are 3 numbers ingrained in my memory from my younger years that I can still recall to this day:
- the home phone number of the house I grew up in
- PI to about 50 decimal places (not sure why I learned this or how I still remember it)
- 6031769
Speccy owners may recognise the third - Manic Miner's famous cheat code. I was originally going to avoid picking the more obvious games for these pages, until a momentous event occurred on 1st September, 2021.
What happened...? After 38 years, I finally completed this game..!! No POKEs, cheats or any other help.
So here we are. Anyway, I'm sure everyone knows the game - collect all the flashing objects on the screen, then head for the exit.
Without going into the intracacies of the game mechanics (though you might want to check out Richard Dymond's excellent disassembly of the game), I thought I'd walk through the screens on my way to completion, along with my impressions of the game.
I've added a difficulty rating (1 = Easiest, 10 = Hardest). Bear in mind this is subjective, and I've assumed you haven't looked at a walkthrough, so just like 'back in the day', need to (a) work out a viable route for each screen, and (b) successfully execute said route.
It stands to reason that there may be a few MINOR SPOILERS below, just in case you wanted to tackle this game on your own in future.
1. Central Cavern
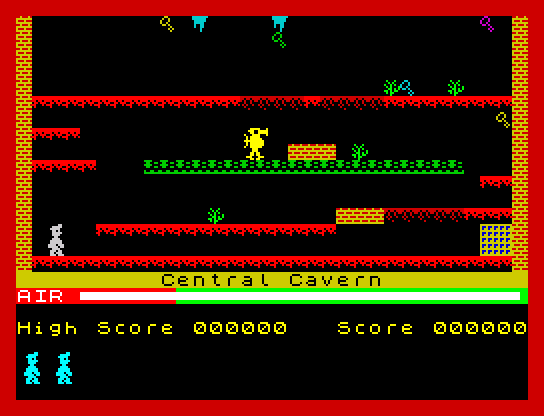
There's been plenty of discussion over the years about this first screen. There's only one moving enemy, but the devious positioning of scenery items makes it quite tough for an opening game level.
The jumps between the spiky bushes, and particularly the one for the key hanging from the top stalactite, give the player a challenge right from the off.
Difficulty rating: 4/10
2. The Cold Room
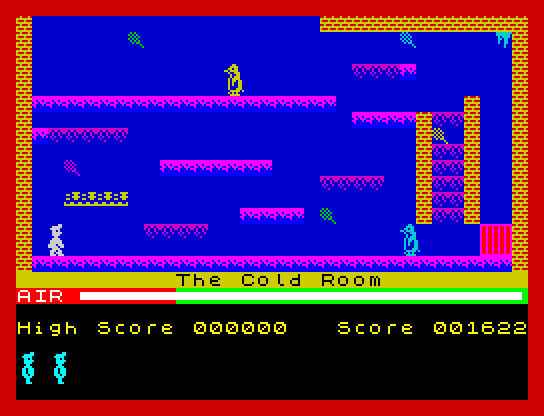
The second screen is probably one of the easiest levels in the game. What's nice is that it introduces the player to how conveyor belt physics works - that you can walk against a belt's direction as long as you hold down the movement key.
The penguins offer little threat and it's a fast level to finish.
Difficulty rating: 1/10
3. The Menagerie
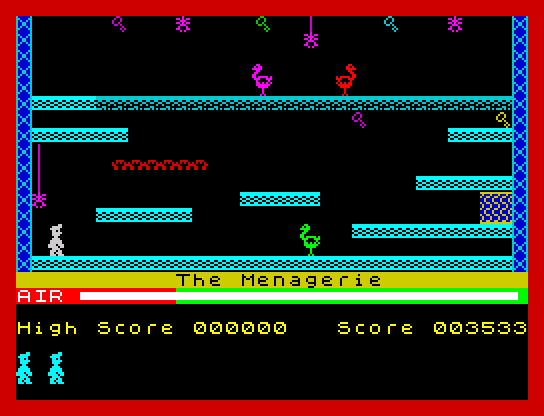
Another fairly quick level to get through.
I found with this one that you need to pick your tactic for the keys at the top and the crumbly platform. And stick to it. Otherwise you can lose the odd life through indecision and panicky jumping...
Difficulty rating: 3/10
4. Abandoned Uranium Workings
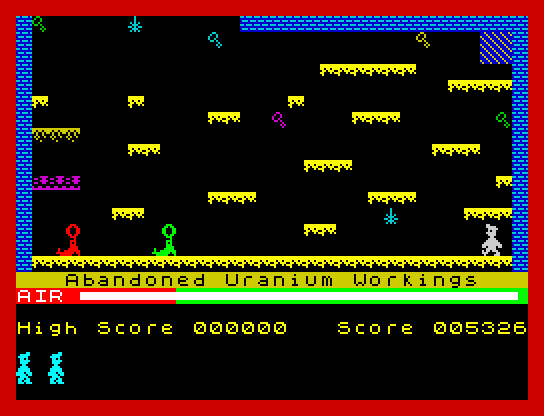
I thought this was a good level for new players to get used to jumping ranges and fall limits. This is another easy level.
Willy has no reason to go anywhere near the two seals, which don't really do anything of note. Once you've picked out your route, it's a breeze.
Difficulty rating: 1/10
5. Eugene's Lair
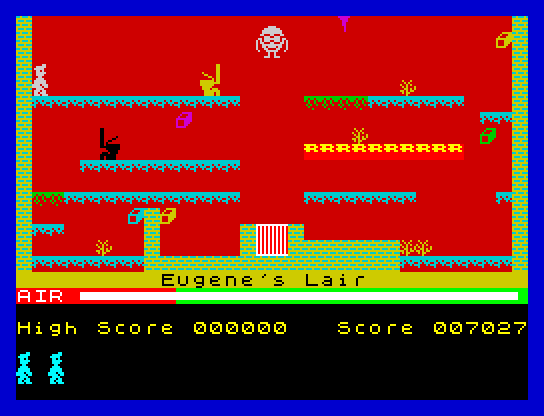
A slightly more challenging screen - I remember dying quite a lot on this screen back in the day.
The key is knowing when to hop onto the conveyor belt on the right, and which object to collect last - after doing so Eugene will descend to block the exit.
Difficulty rating: 5/10
6. Processing Plant
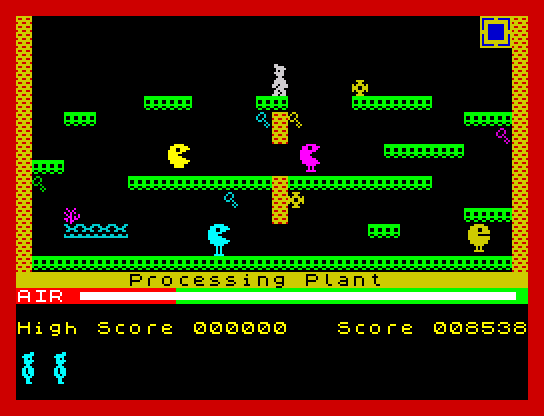
I remember struggling with this screen back in the day, and I'm not too sure why.
There's nothing too difficult about it, though the last jump to the exit needs to be so precise it can be a bit tiresome, though it's good practice.
Difficulty rating: 4/10
7. The Vat
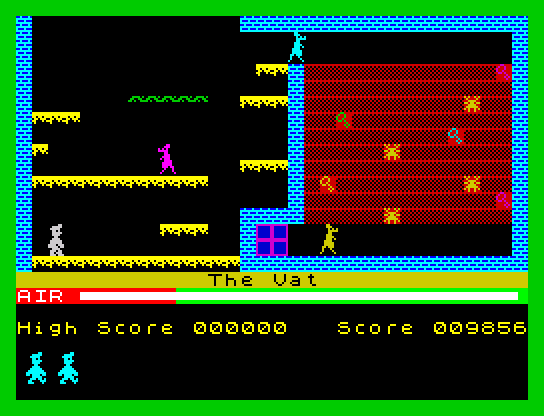
Something I always like about the Vat is that this is the screen you tend to get the nice flash effect, which indicates the acquisition of an extra life.
The main annoyance that I first had with this screen was that deaths tended to occur towards the end of the level, either in the mass of sinking platforms, or by failing to avoid the last kangaroo creature.
The trouble was, like with many screens, that I hadn't stuck with a single working route through that section. Once I picked one that worked and stuck to it - despite it probably being a bit inefficient - the screen got a whole lot easier.
Difficulty rating: 5/10
8. Miner Willy meets the Kong Beast
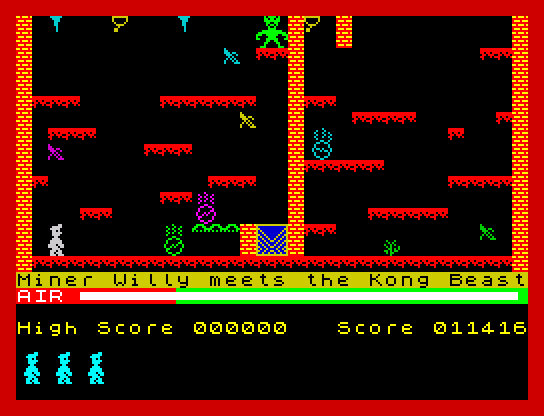
You have to be ready for this screen - as soon as the level starts you have a flaming barrel heading towards you. Once you've negotiated the first two barrels, the rest of the level is OK.
Hitting the second lever to topple the Kong Beast is quite satisfying and gets a nice score bonus which speeds up your journey to an extra life.Difficulty rating: 5/10
9. Wacky Amoebatrons
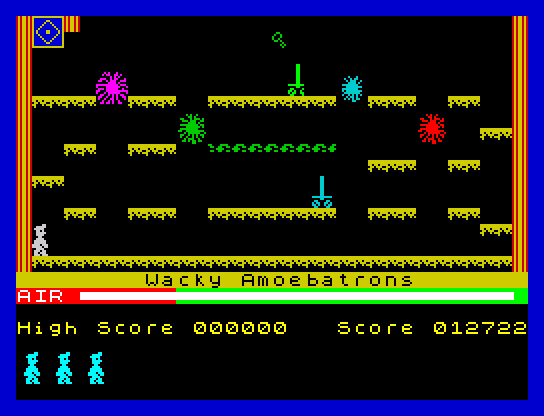
The main thing that killed me on this screen was my own patience - or rather, a lack of it. That, and the timing for the jump onto the conveyor belt. There aren't any other risky bits if you take your time.
Difficulty rating: 3/10
10. The Endorian Forest
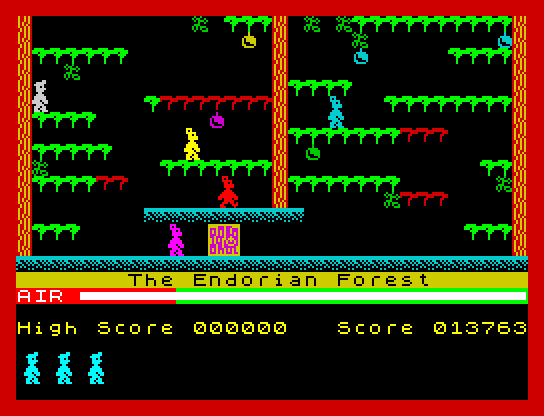
I really struggled with this one at first. It was mainly getting the hanging baubles in the top right before heading for the exit.
I tended to use a standing jump to get over the magenta enemy at the bottom - sometimes I found I went into a 'twitch' mode and mucked up the timing, frustratingly. Even more annoying when I realised way too late that I could've avoided jumping it completely.
Difficulty rating: 5/10
...And that's the halfway point..! Things start picking up from here.
11. Attack of the Mutant Telephones
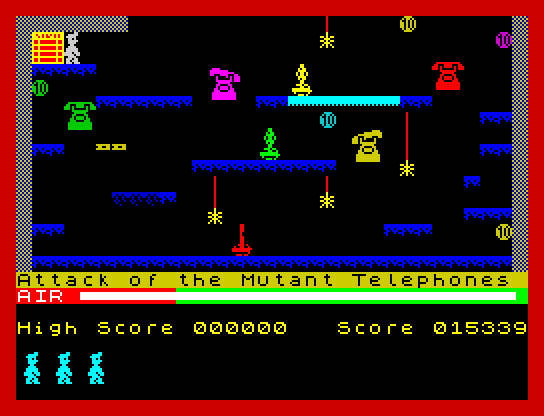
For ages I was taking a crazy route through this screen, until I realised that you could just drop down next to the magenta telephone at the start which made the route MUCH shorter.
Once I'd practised the game a bit, I found that having largely breezed through the previous screens, this was the point where I was likely to start losing the odd life.
It was normally either the red spinny thing at the bottom of the screen, or the run along the top back to the exit, that'd cause me some trouble.
Difficulty rating: 7/10
12. Return of the Alien Kong Beast
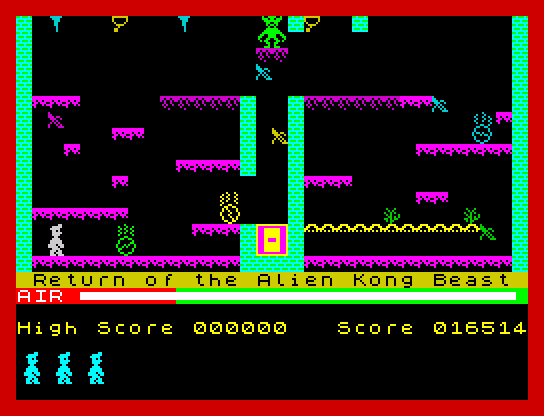
Another chance to topple Kong! Again, we have the barrel immediately rolling towards you as you start the level - this can be a double hazard where you can lose two lives in quick succession if you're not careful.
You can see where to go almost straight away though. The 3 points where you have to be slightly careful are the conveyor belt, the cyan barrel in the top right, and remembering to watch where the yellow barrel is when falling into the exit. But otherwise not too bad.
Difficulty rating: 6/10
13. Ore Refinery
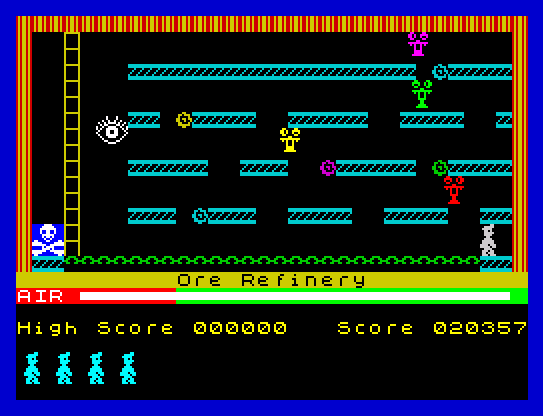
I completed this screen the first time I reached it. So it's easy, right? Well, it's actually easy to muck it up - on a later game I got overly confident and managed to lose all my lives on it. The tricky part for me is that the horizontal moving... err... - things - move at different speeds so you need to be careful you don't get 'double-teamed'.
I'd still say it's not one of the harder screens though. The initial step onto the conveyor belt looks like a trap at first, but it's moving right rather than left, so is fairly safe. There are also plenty of different approaches you can take for this screen, many of which work fine.
Difficulty rating: 5/10
14. Skylab Landing Bay
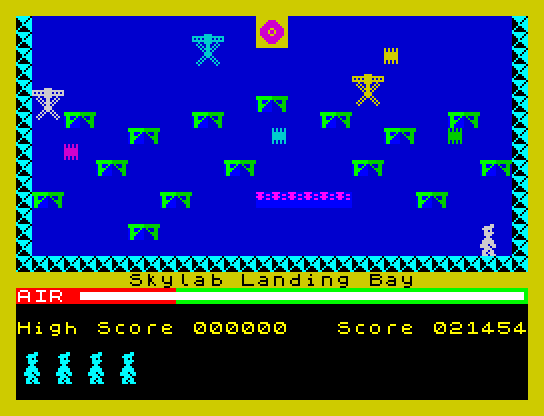
...Right - into the business end of the run now..!
A lot of players consider this the first of the game's real difficultly spikes. When you first play the screen it feels like the falling hazards are dangerously random. Unlike other levels where enemies are always visible, many of Willy's jumps here feel as if they're being made with blind faith.
Having said that, once you've learned the timings, the screen suddenly becomes easy. There's a set falling order, meaning that you can time your movements so you don't get even slightly close to hitting anything.
Because of this I mulled over what difficulty score to give it for some time. Ultimately I decided to err on the high end of the difficulty - simply because the screen has become the bane of a lot of players over the years. I also found working out timings took a bit of trial and error.
Difficulty rating: 8/10
15. The Bank
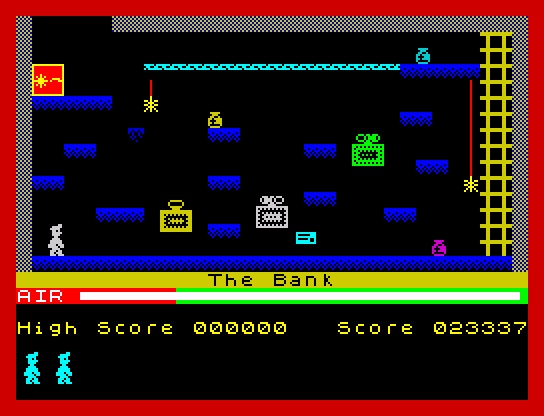
I always felt this was a slightly strange screen. There are quite a few redundant platforms and hazards, but you only have to look at the screen briefly to guess how to handle it. The only real decision points are whether you need to jump over or under the safes.
Two small sticking points on this screen- there's a long platform jump to get up to the money bag in the middle of the screen. Then you have to be slightly careful jumping past the green safe - it moves fast, so you have to get the right clearance.
...But if you've got this far, you should be able to handle it.
Difficulty rating: 5/10
16. The Sixteenth Cavern
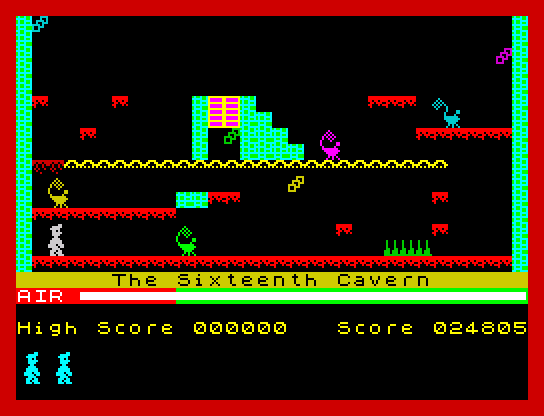
I remember the first time I got to this screen - being one of the later screens I was ready for a fiendish challenge. But it was fairly straightforward - just got to remember to watch your jumps, but there's nothing that needs much in the way of reactions.
Difficulty rating: 5/10
17. The Warehouse
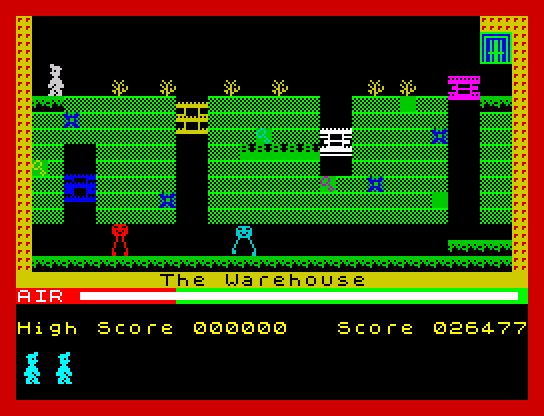
Things get tough here - a combination of sinking plaforms littered with hazards, and fast moving spinning blades.
I found it took quite a bit of time to get a route I felt I could trust on this screen. I was scratching my head for a while, and I couldn't get the timing with the sinking plaforms and the blue rotating nasty, which moves quite quickly. Oh, and I realised I needed to avoid landing on the conveyor belt, which usually means the loss of a life.
One saving grace is that most of the deaths you're likely to experience on this screen will happen in the first section, which makes it less painful in practise. Once you get to the bottom of the screen, past the cyan striding thing, it's a walk in the park to pick up the last two keys and jump to the exit.
Difficulty rating: 8/10
18. Ameobatrons' Revenge
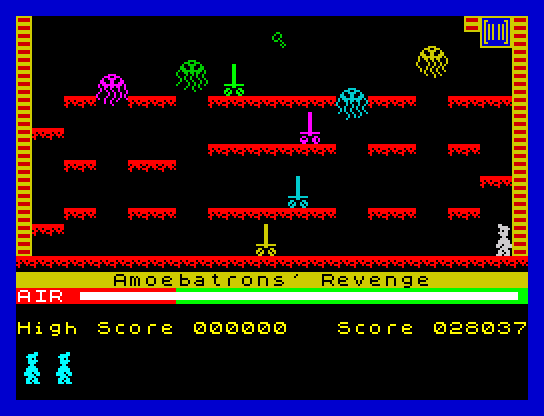
At first glance there doesn't look to be too much difference between this screen and Willy's first encounter with the Amoebatrons in screen 9. So it's easy, right?
I'd probably say... Not really! The Amoebatrons move faster, and the variable speeds of the rolling enemies keep you on your toes.
One of the slightly frustrating parts of this screen is that it seems to last ages, as you traverse the screen from side to side. This can make it mildly annoying when you lose a life.
...Especially when you know what's coming up...
Difficulty rating: 7/10
19. Solar Power Generator
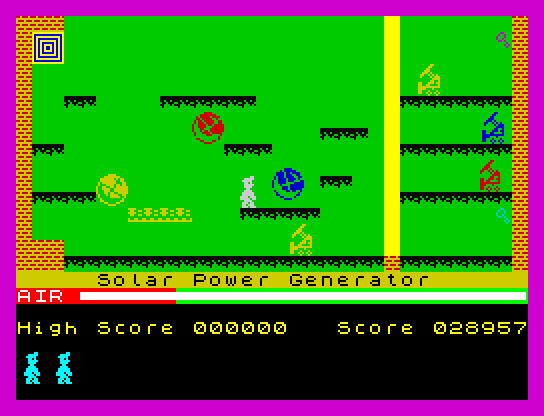
Anyone who's had much exposure to Manic Miner will be fully aware of this screen.
Ornstein and Smough (Dark Souls), Father Gascoigne (Bloodborne). And way before them, the Solar Power Generator (Manic Miner). Difficulty spikes spanning generations of gamers.
I'm not sure what someone did to Matthew Smith to annoy him enough to create this level for his players. With a couple of pixel perfect jumps it's already a tad awkward; throw in an eye-straining colour scheme, and a fast moving beam that drains your air supply ("a new game mechanic on the penultimate screen? Hey, why not...") - this screen is a bane for even experienced MM players.
This is the screen that nearly broke me and caused me to rage quit this game. It's difficult to work out the best route to take to preserve your air supply. It's easy to experience multiple life loss as Willy's starting position is very close to one of the rotating enemies.
But for those of you still trying to beat this screen, don't despair...!
Firstly, figure out a good route. If your key collection order is leaving with virtually no air even on a good run, try switching it to a different collection.
Secondly, once you've played the screen (and usually died) a few times, try to see where you could possibly jump and avoid a beam or two while you're waiting for something to move out of the way. It feels random at first, but it certainly isn't.
Finally, remember - it's possible to mess up a pixel perfect jump (or two) and still complete the level. Though usually it's with a sliver or air left.
You can treat this as if it were the final screen. Because the final one is a breeze compared to this...
Difficulty rating: 10/10
20. The Final Barrier
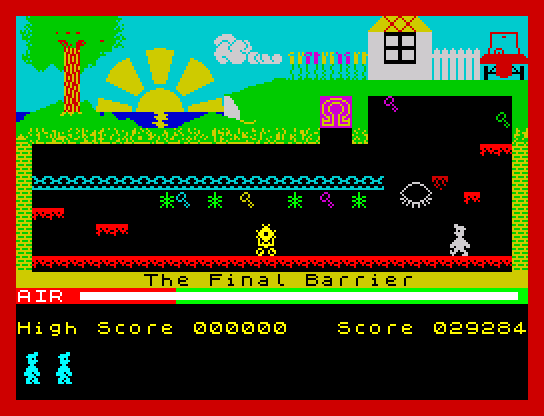
Anyone who's "6031769'd" this game may remember how surprised they were when they tried this screen. Short and sweet. And pretty easy.
The conveyor at the top looks like a trap, but once you realise you can slow/stop yourself on it, it's pretty straightforward.
The only sticking point is likely to be the standing jumps needed to get over the yellow rolling windmill thing. And even then, it's knowing it's the last screen that can add pressure and cause you to panic.
...Not much surpasses the elation of being carried on the conveyor belt to the flashing exit for the first time..!
Difficulty rating: 4/10
Summary
Manic Miner, along with its sequel Jet Set Willy, spawned a hoard of groups, fan games and content, still played and created to this day. While not always lauded as the slickest of games compared to later titles, its legacy will always be recognised.
Aside from the game oozing with the quirky humour of a teenage Matthew Smith, for me it's all about the game's simplicity, playability and addictiveness.
As an 'average' gamer, it always felt as if one day I'd be able to finish it - OK, so I would've probably predicted a sub-30 year time span, but hey, there are a lot of games out there to play. The difficulty level is much lower than some other all-too frequent 'crushingly tough' games of the time (I'm looking at you, Technician Ted!). There are no unfair or random elements (I'm looking at you, Monty Mole crushers!). Just continual progress as you figure out your routes through the screens.
Once you finish it, you may find that successive runs are easy. You amass a lot of lives from the earlier levels and may find you can clock the game multiple times. But there are always further challenges, such as the highest score you can achieve from a single run. The competition for this game sets the bar high - it's had a lot of players over the years.
So what's next - Jet Set Willy? I think I might just save that one for retirement. The thought of the Banyan Tree still makes me shudder...